Prosthetics - Preparing the cast for moulding!
Once the positive cast has been made, it now needs to be prepped ready for moulding. This includes rasping the surface of the cast, to even out any uneven or unwanted textures. "A rasp is a very similar tool to a file, in that it is a shaped metal bar with teeth that shape or smooth a surface through abrasion." (Wonkeedonkeetools, n.d).
Figure 1 - Smoothing the cast (Brown, J. 2020)This process needs to be done until the desired smoothness has been accomplished, and make sure not to get rid of any important details, such as around the eyes, nose and mouth.
The markings over the eyebrows and hairline from the casting step should be visible on the cast. Small drill holes can be made along these lines to keep them in tact, as they may be lost after rasping, and won't show up on the mould later on.
 |
| Figure 2 - Drill holes on cast (Brown, J. 2020) |
This cast did have a few imperfections around its perimeter, as the scrim in the plaster was placed too close to the edges. This is something that needs to be kept in mind for future casting, as it could ruin the cast if this happens too close to the face or main details.
Once this is complete, it is time to correct the core. This is done to eliminate any undercuts. An undercut is anything like a cavity, or a recessed area of the cast that would cause the mould to get locked into place with the cast. (Protolabs, n.d). Examples can be seen in figure 3 and 4.
 |
| Figure 3 - Example of a mould with no undercuts (Bray, S. 2016) |
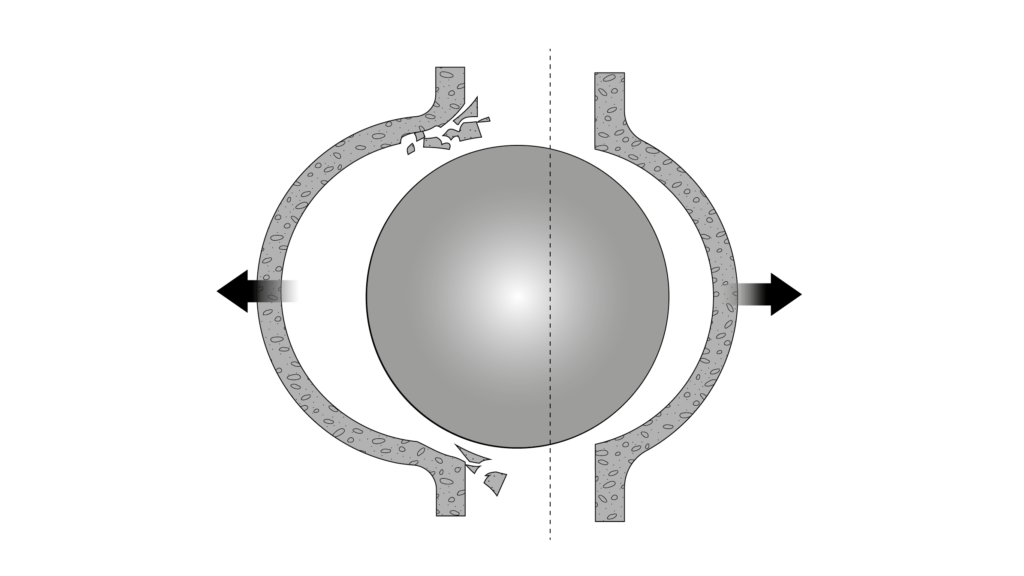 |
| Figure 4 - Example of a mould with undercuts (Bray, S. 2016) |
To fix these undercuts, buff clay is used. This lifts the cast up and holds it at a good angle, and is used to fill any gaps or undercuts that may be present. There was a small crevice by the eye on this cast, so a little bit of clay was used to fill that in to create an even surface.
 |
| Figure 5 - Corrected core (Brown, J. 2020) |
 |
| Figure 6 - One of the keys attached to the clay wall (Brown, J. 2020) |
References:
- 6 ways to achieve undercut success in molded parts. (no date) Available from https://www.protolabs.com/resources/design-tips/6-ways-to-achieve-undercut-success-in-molded-parts/ [Accessed 09/10/2020].
- What is a rasp? (no date) Available from https://www.wonkeedonkeetools.co.uk/files/what-is-a-rasp [Accessed 09/10/2020].
Bibliography:
- Debreceni, T. (2019) Special makeup effects for stage and screen: Making and applying prosthetics. 3rd ed. Abingdon, Routledge.
Figures:
- Figure 1, 2 - Brown, J. (2020) York College.
- Figure 3, 4 - Bray, S. (2016) Undercuts. Available from http://www.learnmakeupeffects.com/undercuts/ [Accessed 09/10/2020].
- Figure 5, 6 - Brown, J. (2020) York College.
Comments
Post a Comment